VMware vSphere VM Encryption with an External KMS
This guide explains how to protect your VMware vSphere infrastructure using Eviden KMS as an external Key Management Server (KMS), and walks you through the full setup:
- Why use an external KMS with vSphere?
- Architecture and security principles
- What gets protected
- Setting up certificates
- Configuring the KMS server
- Connecting vCenter
Overview
| Item | Details |
|---|---|
| Protocol | KMIP 1.1 over TCP/TLS with mutual certificate authentication |
| Port | 5696 (IANA-registered KMIP port) |
| Key type | AES-256 symmetric key |
| vSphere version | vSphere 6.5 and above (Standard Key Provider) |
| Eviden KMS feature | Works with both FIPS and non-FIPS builds |
Why Use an External KMS with vSphere?
VMware vSphere supports three key provider types (since vSphere 6.5/7.0):
| Key Provider | Available Since | External KMS Required |
|---|---|---|
| Standard Key Provider | vSphere 6.5 | Yes (KMIP) |
| Trusted Key Provider | vSphere 7.0 | Yes (KMIP + vSphere Trust Authority) |
| Native Key Provider | vSphere 7.0 U2 | No (built-in, keys stored in vCenter) |
Using a Standard Key Provider backed by an external, dedicated KMS is the recommended approach for production environments and regulated industries because it provides:
- Separation of duties: encryption keys are stored in a dedicated, hardened system — completely separate from the compute infrastructure they protect. A compromised ESXi host or vCenter cannot expose the master keys.
- Centralised key lifecycle management: key creation, rotation, revocation, and auditing are managed in one place across all workloads.
- Compliance readiness: many frameworks (PCI-DSS, HIPAA, GDPR, SOC 2, FedRAMP) explicitly require that encryption keys be managed independently from the data they protect.
- FIPS 140-3 compliance: Eviden KMS operates in FIPS 140-3 validated mode, satisfying the cryptographic requirements of the most demanding regulatory environments.
- Zero-trust posture: even with physical access to a storage array or datastore, data remains unintelligible without authorised key access from the KMS.
References
Architecture and Security Principles
Key Hierarchy
vSphere VM encryption uses a two-level key hierarchy to minimize key exposure:
| Key | Generated by | Stored | Purpose |
|---|---|---|---|
| Key Encryption Key (KEK) | External KMS (Eviden) | KMS only | Wraps (encrypts) the DEK |
| Data Encryption Key (DEK) | ESXi host | With the VM (wrapped by KEK) | Encrypts VM disk I/O |
The KEK never leaves the KMS in plaintext. ESXi hosts receive the KEK transiently in memory to unwrap the DEK; neither key is ever persisted unprotected on the hypervisor or storage.
Communication Flow
sequenceDiagram
    autonumber
    participant Admin as vSphere Admin
    participant VC as vCenter Server
    participant KMS as Eviden KMS
    participant ESXi as ESXi Host
    participant DS as Datastore (VMDK)

    Admin->>VC: Assign VM Storage Policy
(Encryption enabled)
    VC->>KMS: KMIP Create — request new KEK
(mTLS, port 5696)
    KMS-->>VC: KEK ID + KEK (AES-256)
    VC->>ESXi: Push KEK (in-memory, encrypted channel)
    ESXi->>ESXi: Generate DEK locally (AES-256 XTS)
    ESXi->>ESXi: Wrap DEK with KEK → wrapped DEK
    ESXi->>DS: Store VM files encrypted
(VMDK, VMX, swap — AES-256 XTS)
    ESXi->>DS: Store wrapped DEK alongside VM
    Note over KMS,DS: KEK resides only in KMS.
Wrapped DEK stored with VM.
Plaintext DEK exists only in ESXi RAM.

    rect rgb(240, 248, 255)
        Note over VC,ESXi: On VM power-on (key refresh)
        ESXi->>VC: Request KEK for this VM
        VC->>KMS: KMIP Get (KEK ID)
(mTLS)
        KMS-->>VC: KEK
        VC-->>ESXi: KEK (in-memory)
        ESXi->>ESXi: Unwrap DEK using KEK
        ESXi->>DS: Decrypt/Encrypt disk I/O using DEK
    end
Network Architecture
graph TB
    subgraph Mgmt["Management Network (isolated)"]
        VC["vCenter Server\n(KMIP client)"]
    end

    subgraph KMSZone["KMS DMZ / Secure Zone"]
        KMS["Eviden KMS\nport 5696 (KMIP/TLS)\nport 9998 (HTTP API)"]
        DB[("Key Store\n(SQLite / PostgreSQL\n/ Redis-findex)")]
        KMS --- DB
    end

    subgraph Compute["Compute Cluster"]
        ESXi1["ESXi Host 1"]
        ESXi2["ESXi Host 2"]
        ESXiN["ESXi Host N"]
    end

    subgraph Storage["Storage Network"]
        SAN["SAN / NFS Datastore\n(encrypted VMDKs)"]
    end

    VC -- "KMIP 1.1+\nmTLS (port 5696)\nCertificate Auth" --> KMS
    VC -- "Push KEK\n(encrypted, in-memory)" --> ESXi1
    VC -- "Push KEK" --> ESXi2
    VC -- "Push KEK" --> ESXiN
    ESXi1 -- "AES-256 XTS\nencrypted I/O" --> SAN
    ESXi2 -- "AES-256 XTS\nencrypted I/O" --> SAN
    ESXiN -- "AES-256 XTS\nencrypted I/O" --> SAN

    style KMSZone fill:#e8f5e9,stroke:#388e3c
    style Mgmt fill:#e3f2fd,stroke:#1565c0
    style Compute fill:#fff3e0,stroke:#e65100
    style Storage fill:#fce4ec,stroke:#c62828
Security Properties
| Property | How it is enforced |
|---|---|
| Encryption at rest | All VMDK files, VM swap files, VM core dumps, and the VM configuration (VMX) are encrypted with AES-256 XTS on the ESXi host before any write to the datastore |
| Key separation | KEK lives only inside Eviden KMS; the ESXi host holds the plaintext DEK in RAM only for the duration of active I/O |
| Mutual TLS (mTLS) | Both vCenter and Eviden KMS authenticate each other with X.509 certificates over every KMIP connection; no unauthenticated key request can succeed |
| No keys on storage | The datastore contains only the wrapped DEK (ciphertext); raw key material is never written to disk outside the KMS |
| Audit trail | Every KMIP operation (Create, Get, Activate, Revoke, Destroy) is logged by Eviden KMS with timestamp, caller identity, and key ID |
| Key rotation | VMware supports re-keying VMs (shallow re-key: new KEK; deep re-key: new DEK + new KEK) without downtime on vSphere 7.0+ |
| FIPS 140-3 | Eviden KMS uses a FIPS 140-3 validated OpenSSL 3.x provider; all symmetric keys use AES-256; all asymmetric operations use NIST-approved curves |
| Revocation / disaster recovery | Revoking the KEK in Eviden KMS immediately prevents any new VM power-on or vMotion, enabling a cryptographic kill-switch |
What Gets Protected
Encryption at Rest
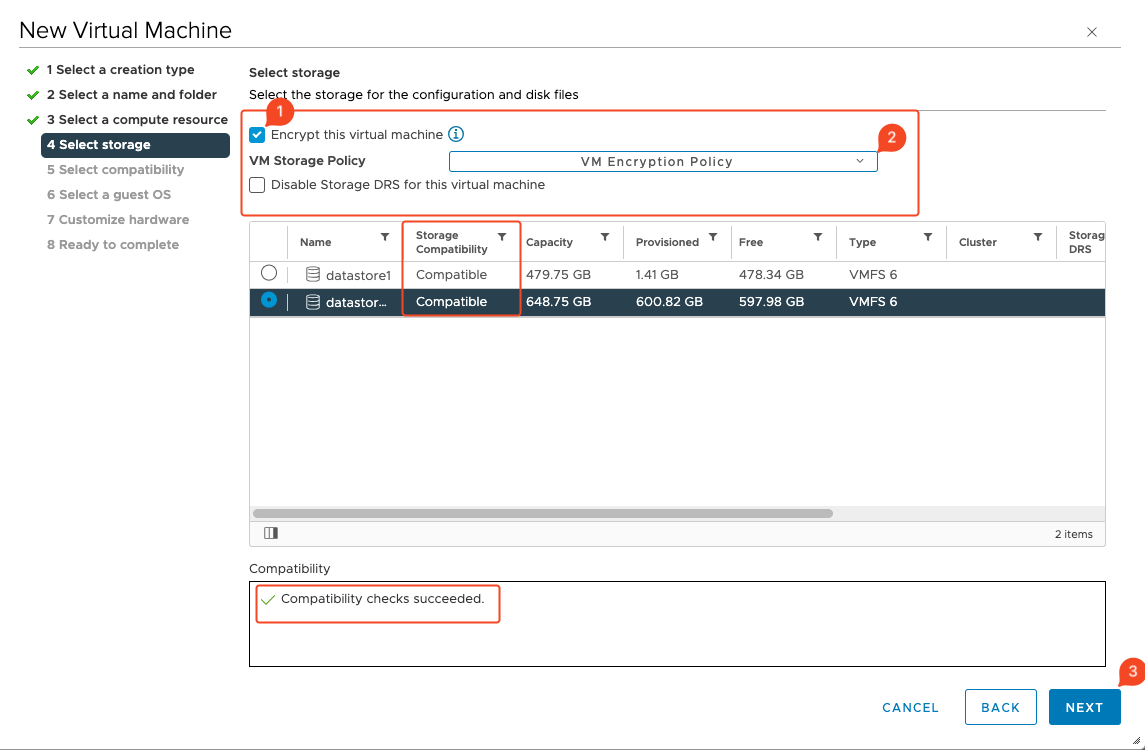
When a VM Storage Policy with encryption is applied, the following objects are transparently encrypted:
- VMDK files (flat and sparse) — all disk data via AES-256 XTS
- VM configuration file (
.vmx) - VM swap file (
.vswp) — prevents memory snooping via storage - VM core dump files (
.vmss,.vmem) — prevents key material leakage in snapshots and crash dumps - Snapshot delta disks (
.vmdkdelta files created during snapshot)
Items not encrypted by VM encryption: vSphere log files, NVRAM state, and the vSphere datastore catalogue itself. Use datastore-level encryption (vSAN Encryption or storage-array encryption) as a complement for full coverage.
Encryption in Transit
All key material travels over mutually authenticated TLS:
- vCenter ↔ KMS: KMIP 1.1+ over TLS 1.2+, enforced by certificate pinning on both sides
- vCenter ↔ ESXi: key distribution uses the internal vSphere encrypted management channel
- KMS API: Eviden KMS exposes its management API over HTTPS (TLS 1.2+); the KMIP socket server runs on a dedicated port (default 5696)
Access Control
- Only vCenter Server (identified by its client certificate) can request keys from the KMS
- ESXi hosts never communicate directly with the KMS; they receive KEKs from vCenter through the authenticated management plane
- Eviden KMS access control enforces per-key and per-user permissions; the vCenter service account should be granted the minimum set of KMIP operations (
Create,Get,Activate,Revoke,Locate)
Prerequisites
- OpenSSL (≥ 1.1.1) installed and on your PATH
- A working copy of
openssl.cnfwith a[ v3_ca ]section - UNIX shell (bash, zsh, etc.)
- A directory to store your certificates, e.g.,
/etc/ssl/{{ORG_NAME}}_certs - VMware vSphere: 6.5 or higher
1. Generate Your CA
Create a 2048-bit RSA private key for your CA, then issue a self-signed root certificate:
# 1. Generate CA private key
openssl genrsa -out ca.key 2048

# 2. Create self-signed CA certificate (10 year validity)
openssl req -x509 -nodes -days 3650 \
  -new -key ca.key \
  -out ca.crt \
  -config openssl.cnf \
  -extensions v3_ca \
  -subj "/C=<COUNTRY>/ST=<STATE>/L=<CITY>/O=<ORG_NAME>/OU=<UNIT>/CN=<CA_COMMON_NAME>"
ca.key: CA private key (keep this highly secure!)ca.crt: Public root certificate, used to sign and verify downstream certificates
2. Generate Server Key & CSR
Create a new 2048-bit RSA key for your KMS server and a CSR including EKU extensions:
openssl req -newkey rsa:2048 -nodes \
  -keyout server.key \
  -out server.csr \
  -subj "/CN=<SERVER_COMMON_NAME>/O=<ORG_NAME>/C=<COUNTRY>" \
  -addext "keyUsage = digitalSignature, keyEncipherment" \
  -addext "extendedKeyUsage = clientAuth, serverAuth"
server.key: Server’s private keyserver.csr: Certificate Signing Request, withclientAuth&serverAuthEKUs
3. Sign the Server Certificate
Use your CA to sign the CSR, embedding the same EKU settings in the issued certificate:
openssl x509 -req \
  -in server.csr \
  -CA ca.crt -CAkey ca.key -CAcreateserial \
  -out server.crt \
  -days 365 \
  -extfile <(printf "[req_ext]\n\
keyUsage = digitalSignature,keyEncipherment\n\
extendedKeyUsage = clientAuth,serverAuth\n") \
  -extensions req_ext
server.crt: The signed certificate, valid for 1 year
4. Verify the Certificate Extensions
Confirm that your certificate contains the correct EKU fields:
Expected output:
5. Export to PKCS#12
Bundle your server certificate, private key, and CA chain into a single .p12 archive:
openssl pkcs12 -export \
  -in server.crt \
  -inkey server.key \
  -certfile ca.crt \
  -out server.p12 \
  -name "{{SERVER_ALIAS}}" \
  -passout pass:<P12_PASSWORD>
server.p12: PKCS#12 archive containing your key and certificates<P12_PASSWORD>: Password to unlock the archive — use a strong secret!
6. Configure the KMS Server (kms.toml)
Below is a template kms.toml. Update file paths, usernames, and passwords as required:
# General Configuration
default_username = "<USERNAME>"
force_default_username = false
socket_server_start = true

[http]
port = 9998
hostname = "0.0.0.0"
# TLS configuration moved to [tls] section
# See the [tls] section below for certificate configuration
authority_cert_file = "/etc/ssl/{{ORG_NAME}}_certs/ca.crt"
Start the KMS with:
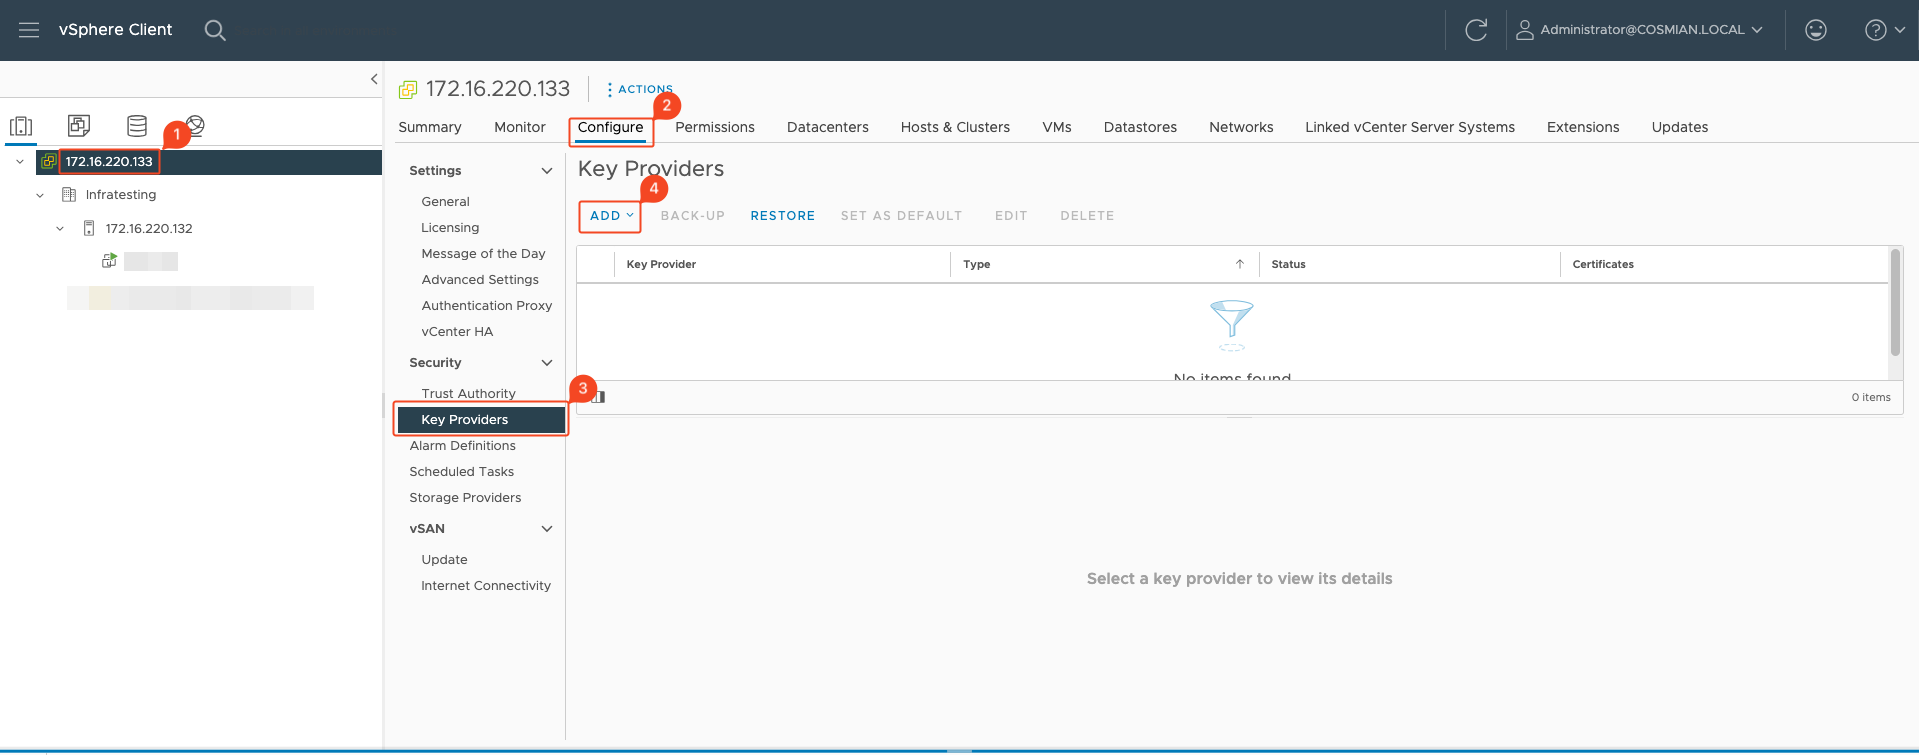
vCenter Integration
Step 1: Go on your vCenter UI and add a Key Provider
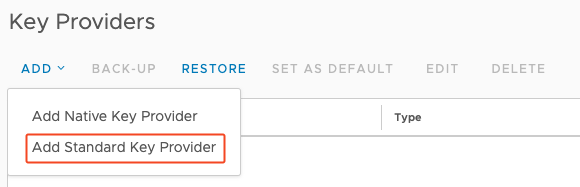
Step 2: Add new Standard KMS Provider
Step 3: Set up your Standard Key Provider

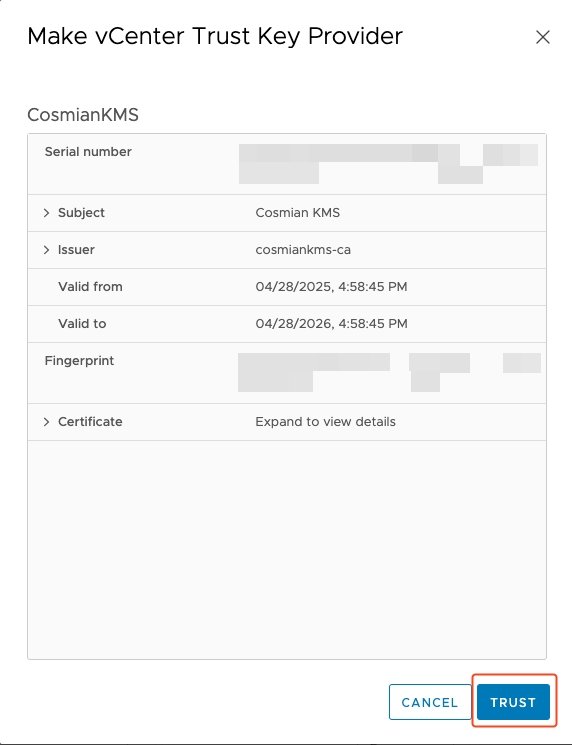
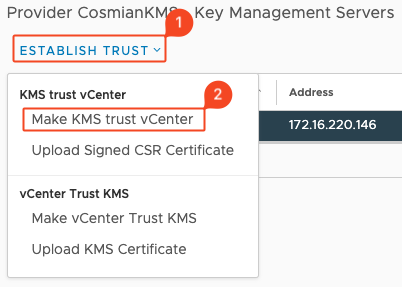
Step 4: Trust the newly added Eviden KMS
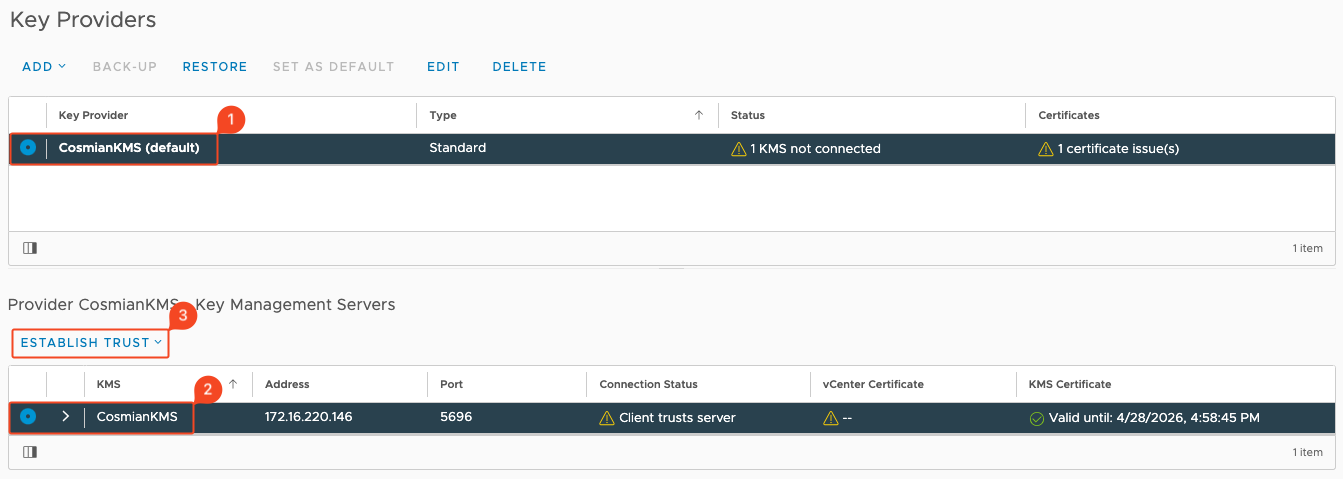
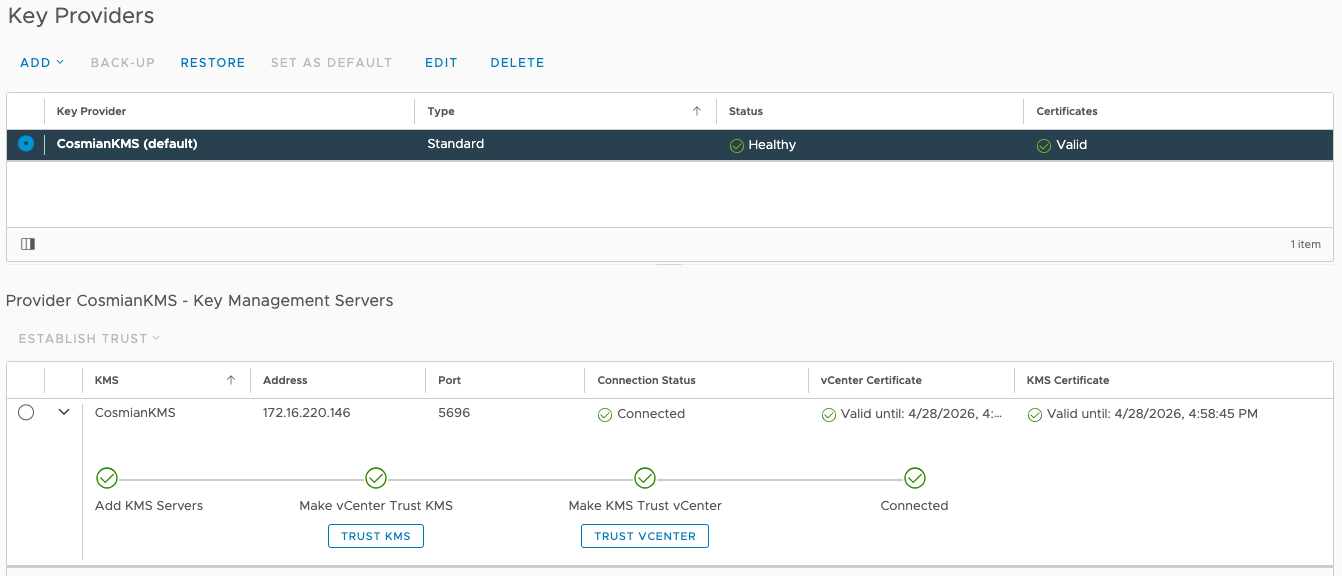
Step 5: Establish Trust with the Eviden KMS
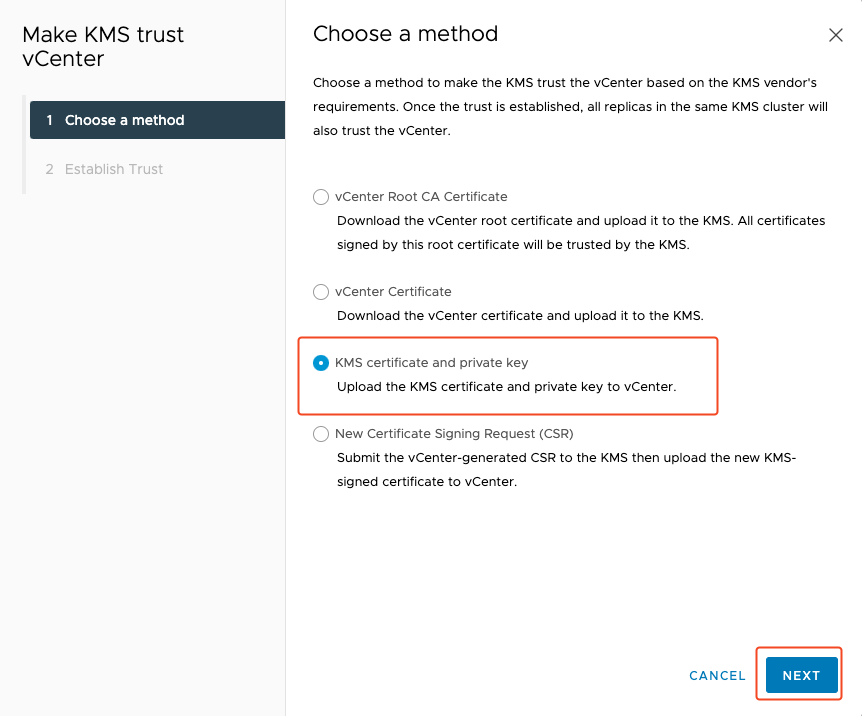
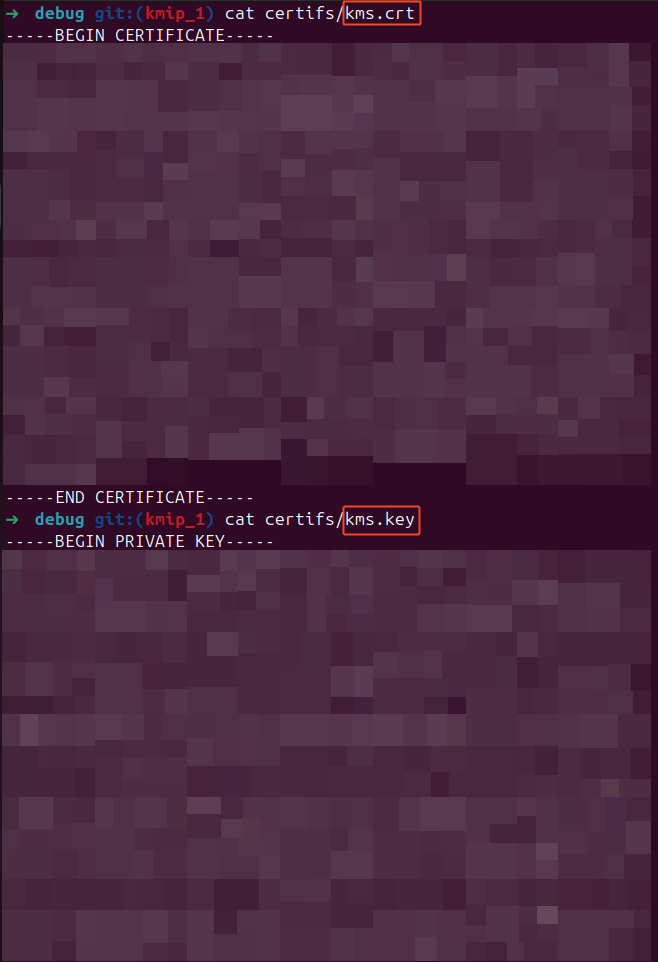
Step 6: Go on the KMS server and get .crt and .key certificates
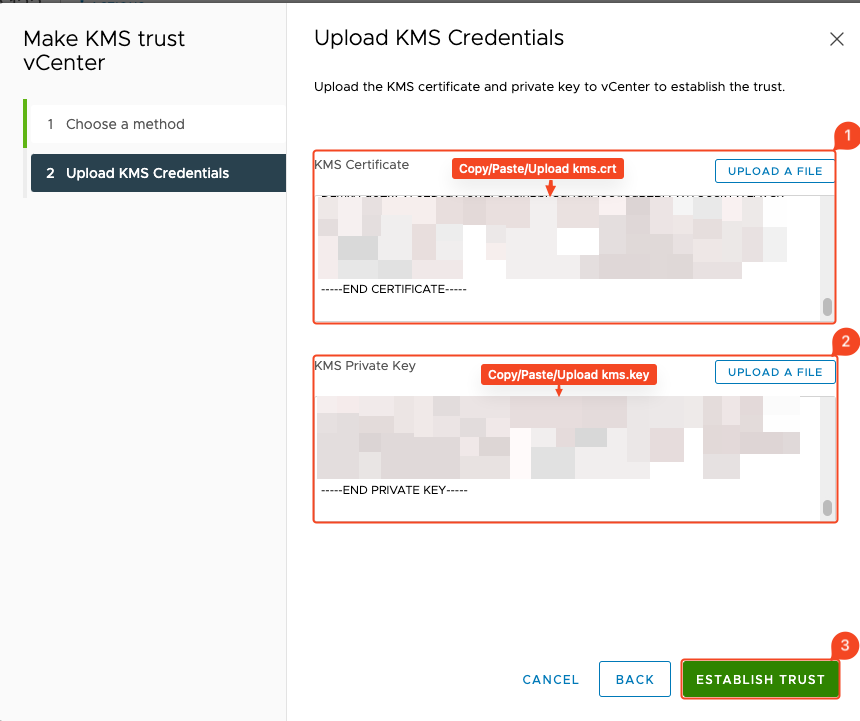
Step 7: Upload KMS Credentials and establish trust
Step 8: Your KMS is connected
Bonus: Encrypt your Virtual Machine
Keep all private keys secure and back up your CA key (
ca.key) offline in an encrypted vault.